CES 2016: Demo Oculus Rift, well worth the wait!
Demo of Oculus Rift at CES 2016.
*Note: I mentioned at the end of the video the FAA drone restrictions. As of December 2015, all drones between the weight of 0.55 and 55 lbs needs to be registered. It can be done at registermyuas.faa.gov. If you do it before January 20, 2016 you will be refunded the $5 fee.


Welcome to JaredBodine.com. Today I’ll be giving you a 45 second Lenovo Yoga Tab 3 Review, 8″ version.

The Quad-core 1.1Ghz processor and 1Gb of RAM run Android 5.1 (Lollipop) smooth and flawlessly.
The 8″ screen sports a 1280×800 resolution and supports 10-point multi-touch.
The camera is 8 megapixel and rather than have one camera on the front and back, it rotates around.

Wireless B/G/N lacks the newer AC standard, but still gets decent range and speed. It also has Bluetooth 4.0.
Storage includes 16Gb and offers micro-SD card support, up to 128Gb.
For a tablet of this size, the sound is incredible, sporting front facing stereo speakers and Dolby Atmos sound.
The most unique aspect of this tablet is the integrated kickstand which offers 4 usage modes: Hold, Tilt, stand and Hang, which is unique and can offer creative uses.
The star feature of this tablet is the super long battery life, which advertises 20 hours of use and 95 days of standby on a single charge. My personal use confirms those numbers.

For only $169, this is a super deal. *(Price at time of recording, often better prices can be found.)
On a side note, I use mine as master control for my smart home, though use of the Logitech Harmony, Nest and other free apps. Do you have a Yoga Tab? How do you use it? Have you tried the Hang mode? Let me know, or feel free to ask me questions in the comments below.
Thank you for viewing my 45 second review of the new Lenovo Yoga Tab 3 review, 8″ on JaredBodine.com, the Tech You Need To Know.

How is the new Nest Learning Thermostat Gen 3 and how does it stack up to the second generation?
If you have questions about the products or want to share your experiences with your Nest, feel free to leave a comment below!
With more people cutting the cable cord, media streaming devices are becoming increasingly popular.
There are a bevy of devices from Apple and Amazon to Google and even Western Digital.
For the buck, I believe the best bang comes from Roku. But just narrowing down your choices to brand isn’t enough any more. Roku has a staggering 5 versions available right now.
In today’s 45 second review on JaredBodine.com, I’ll be giving you a rundown of the different models to help you decide which is right for you.

The entry level device is the Roku Stick at $49. This tiny wonder plugs directly into your TV’s HDMI port but extra power is still required. The included remote will get the job done, but lacks the signature headphone jack and voice search of higher models.
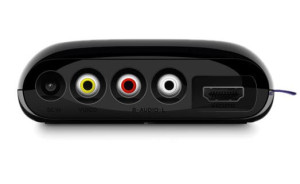
The Roku 1, for the same price, is the only model to feature old-school connections – you know; the yellow, red and white RCA plugs. It’s got the weakest hardware and no memory card ports, but if you still have a box TV, that probably isn’t an issue for you.
The $69 Roku 2 has better specs under the hood but it’s included remote is basic, also missing headphones and voice search.


The $99 Roku 3 is identical to the 2 in terms of specs, but sports the upgraded remote.
The newest and most expensive choice is the $129 Roku 4, which features 4K video and a nifty remote finder button.

Whew! So, which one to get? If you are an avid road warrior, the Roku Stick is portable and adequate.
Only get the Roku 1 if your TV lacks HDMI. Unless you have a 4K TV and can find plenty of 4K content, skip this one for now.
Only get the Roku 3 if the added remote features are must-haves for you. For most users I recommend the Roku 2 which has premium components and high def video at a reasonable price. I have a universal remote so I don’t care about the included remote.
So, for most everybody, the Roku 2; good choice for you.
This has been your 45 second review of 2015 Roku lineup on JaredBodine.com, the Tech you need to know.

Hi Jared. I hate to bother you with this, but I have a major problem. I was trying to delete files off of my flash drive, and somehow I ended up deleting Photos library on my Mac, which contained all of my pictures! Now all of my pictures are gone and I don’t know how to get them back. Please help!
This is the kind of thing that makes anyones heart just sink. How sad would anyone be to lose every single photo of their friends, family and travels all at once? I once almost lost all I had due to a combination of a failed NAS and internal HDD. Fortunately, this situation is easier to fix than mine was.
For this, I will refer to the file you need as Photo Library. This is a single file where all of your photos and settings in Photos will be saved. Unlike Picasa or other popular photo management programs, your files are not saved as separate photos and a database file. Instead, it’s all encompassed in a single file. That is good if you want to back up your whole library at once. But that is horrible if you want to transfer a single photo or, in your case, accidentally delete the wrong file.
There are a couple preventative measures that Apple has in place to save you from yourself in situations where you accidentally delete important files by accident. One is Time Machine, which too few users take advantage of. The other, which I recommend you try first, is recovering files from your Trash. I’ll cover both.
One note before I get into it, if you have an older Mac you may have an older style database for use with the now retired iPhoto. This will be the same process, but you will look for a file called “iPhoto Library” instead of “Photos Library.”
Depending on a few factors (how much free HDD space is left on your Mac, how large the deleted files are and how long ago they were discarded), there is a good chance your files are just sitting in your Trash waiting for you.


If you can’t find it this way, look to see if you have an older copy backed up through Time Machine.
 Go back to the most recent backup where you see the file “Photos Library” in the list of files. If you are confident that version is recent enough, restore it.
The latest backup is probably not as recent as the version dug out of Trash, but better than nothing. If you are unable to find a Time Machine backup of the Photos Library and cannot dig it out of your Mac’s Trash, you may have to try more drastic measures, like the freeware or trialware found on Download.com. I haven’t used any of these for myself, so I can’t recommend one specifically. However, I’ve never needed to use them because one of the two above solutions has always worked for me.
Although I geared this toward your issue of the deleted Photos Library on my mac, this same process can work for ANY accidentally deleted file. If you lost any other important files try this process for them as well.
I’m glad to have helped. If you have any other tech questions, feel free to ask away.
I spend way too much time online. I think I’ve visited every non-porn website out there by now…so about 20. Here’s the 5 funniest dating sites I’ve come across…not that I’m looking.
You can’t date Jared, but you can still visit JaredBodine.com
Honorable mentions:

A new week, a new video. This week we give you a brief yet informative 45 second review of Microsoft October 2015 press conference.
Welcome to your 45 second review on JaredBodine.com.
Here is your recap of the Microsoft Press event held October 6, 2015…in 30 seconds.


This has been your 45 second review of Microsoft October 2015 press conference. Keep it tuned to JaredBodine.com for all the tech you need to know.

Q: I was at home with my iPhone in a different room and my iPad mini was on the table next to me. I heard a ring and opened the cover and somehow the call moved from my phone to my iPad. They called my number, not Skype or FaceTime.
This is the first time in its life I had a phone call on my mini. I didn’t know the mini was a phone. How did it receive a call? WIFI? How do I initiate calls on my mini?